Published 19 Nov 2026
How to Make an Explainer Video in 6 Steps
Watch a 60-second appointment booking demo, then make your own explainer video in six steps. Use the script template and four-scene storyboard to plan the visuals, record your narration and test the final cut.
Tags
Post content
How to Make an Explainer Video in 6 Steps
To make an explainer video, choose one thing the viewer needs to understand, write a short script, and match each line to a visual. Record the narration, build the scenes, then test whether someone can take the intended action after watching.
Here’s a 60-second example for a fictional appointment app. Watch the last two scenes closely. Selecting a time and receiving a confirmation are different moments. If the video ends one click too early, the viewer could walk away thinking they’ve booked.
A sample booking flow, from choosing a consultation to confirming the appointment. The full narration and storyboard appear below.
1. Decide what the viewer should be able to do
Start with this sentence: “After watching, [viewer] can [do one thing] and knows it worked when [visible result].” The last blank tells you where the video should end.
For our example: “After watching, a first-time client can book a 30-minute consultation and recognize the booking confirmation.” That brief rules out a tour of account settings, a list of every service and a pitch for the mobile app. It also gives the editor a clear final shot.
2. Choose the format and the simplest tool for the job
| What you need to explain | Format to try | What to prepare |
|---|---|---|
| A task in an app | Screen recording | A demo account, sample data and a clean run through the task. |
| An idea the camera can’t show | 2D animation or motion graphics | A visual for each idea, such as two calendars updating when a booking is confirmed. |
| A physical product or technique | Live action | A clear view of the product and a close-up of the hand movement that matters. |
For a working booking app, a screen recording is usually the shortest route. Our example uses illustrated screens so you can see how to plan a video even before an app is ready to film. A low-cost way to make your own version is to draw four screens in a presentation, reveal the selected button on each slide, and record the slideshow while you narrate. A phone or computer microphone is enough for a first cut.
If you use an online editor, Canva’s explainer video maker is one template-based option. Export a short test with your chosen assets before committing to a template. An AI tool can suggest scenes or shorten a script. Check every button name, screen and spoken instruction against the product yourself.
3. Write an explainer video script and time it aloud
Say the words a customer sees on screen. “Select Confirm booking” gives the viewer a specific action. “Enjoy our seamless scheduling experience” leaves them searching for the right button.
Copyable script template
Goal: Need to [complete a task]? First action: Open [starting point] and choose [specific option]. Decision: Check [detail that could cause a mistake], then select [next action]. Finish: When you see [confirmation], you’re done. You can now [useful next step].
The script used in the 60-second example
Need to book an appointment? Open the booking page and choose a service. We’ll book a thirty-minute consultation. Selecting the service first shows you the times available for that appointment.
Choose a day on the calendar, then pick a time. We’ll choose Thursday at ten. Check the time zone shown above the slots, especially if you’re booking from another location.
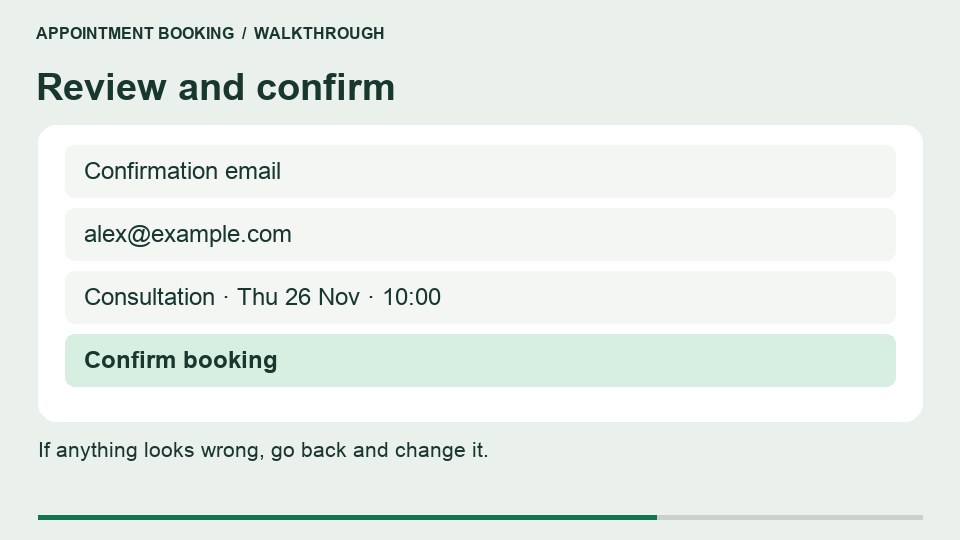
Enter the email address where you want the confirmation. Before you select Confirm booking, check the service, date and time in the summary. If anything looks wrong, go back and change it.
Look for the words Booking confirmed and your appointment details. That’s how you know the booking went through. Add it to your calendar so you can find the time and joining instructions later.
Record a rough read before animating. Leave room for the viewer to find each control, read the time zone and check the confirmation. If the voice runs ahead of the picture, cut a sentence or hold the screen longer. Speeding up the narration makes an unfamiliar task harder to follow.
4. Turn the script into a four-scene storyboard
An explainer video storyboard pairs what the audience hears with what they need to see at that moment. For a screen-based video, a screenshot with a highlighted control can do the job.
| Time | Narration cue | Visual and on-screen text |
|---|---|---|
| 0–15 seconds | Choose a service. | Show “Initial consultation” beside “30 minutes”. Leave both visible long enough to read together. |
| 15–30 seconds | Pick Thursday at ten. | Show the time zone above the available slots. Highlight the selected time. |
| 30–45 seconds | Review before confirming. | Show the sample email, service, date and time together. End on “Confirm booking”. |
| 45–60 seconds | Check that it worked. | Show “Booking confirmed” first, then the appointment details and “Add to calendar”. |
The review scene keeps the appointment details visible while the viewer checks them.
To adapt this storyboard, duplicate the table and replace the timings, narration cues and screen labels. If a line of narration needs three unrelated pictures, split the scene or simplify the line.
5. Record the voice-over and build the visuals
Record in a quiet room with the microphone in one position. Read one scene at a time. If you stumble, pause and restart the sentence so the editor has a clean cut. Place the voice track on the timeline first, then line up the picture with the words that describe it.
For a screen recording, hide notifications, use sample account details and pause the pointer over each control before clicking. To make an animated explainer video, put the interface, text and highlights on separate layers. When the voice says “check the time zone”, highlight the time zone. Save movement for details that would otherwise be missed.
If someone else will animate the storyboard, share the approved script, pronunciation notes, brand assets and target dimensions when comparing animated explainer video services. If you already have the footage, a brief for your video editor should identify the exact screen or frame where each action finishes.
6. Edit, test and publish the video
Watch once on a phone with the sound off. Can you read the captions without covering the button? Then listen without looking. Can you tell which action confirms the booking? Those two passes reveal different problems.
Give a first-time viewer the demo and ask them to book a consultation after watching. Observe where they hesitate. For example, if they stop after choosing a time, hold the review screen longer and give “Confirm booking” its own spoken cue. Repeat the task with a fresh viewer after the edit.
Final export checklist
- Check that the opening frame shows the task and the closing frame shows success.
- Proofread captions against the narration, especially product names, dates and numbers.
- Check that speech is clear, sample data is safe to share and you have rights to any music or visuals.
- Export for the destination, then play the uploaded version on a phone. Check the crop, labels, sound and final action.
The most useful final question is simple: can someone complete the task after one viewing? If they can, you have a practical explainer and a clear way to tell when it needs updating.